| Disclaimer: Microsoft Azure AD is a product offered by Microsoft Corporation. This document shows how to configure applications in Azure AD using Microsoft Azure Portal. What is shown here is valid at the time of writing and can be referred to as a guide line to understand how applications should be setup in Azure AD. This can change over time. Please refer to the latest Azure AD documentation for more up to date information. |
When Microsoft Azure AD is used as the Open ID Provider the applications that need to be authenticated using Azure AD have to be registered and configured in Microsoft Azure AD. There are two ways to set this up. One is to use one application registration. This is the new way to do it since Azure AD only started to support it a while after the release of IFS Applications 10. It is still also possible to set the application registrations up the old way, and it is documented how to do so here also in case understanding of the old process is needed.
This is by no means an exhaustive list of the things that can be done with Azure AD, but this is the minimal amount of steps needed to get IFS Applications working. Other things may need to be done as well depending on customer requirements.
The following steps allow you to create the app registration:
The following steps allow you to create the web app registration:
The following steps are to create the native app registration:
For Aurena B2B, the native app registration can likely be skipped and left blank in the IFS MWS admin console. This is due to the fact that no first-party native applications use this Application Type. This means step 4 of the web app registration setup can also be skipped. The only other difference from the DEFAULT Application Type is replacing "main" with "b2b" in the redirect URI:s, as detailed above.
After the applications have been added to Azure AD as explained in the above section, some configurations are needed in IFS Middleware Server Admin Console to finish setting up IFS Applications to use Microsoft Azure AD as the Open ID Connect Identity Provider.
Login to IFS Admin Console. Go to "Common > Security".
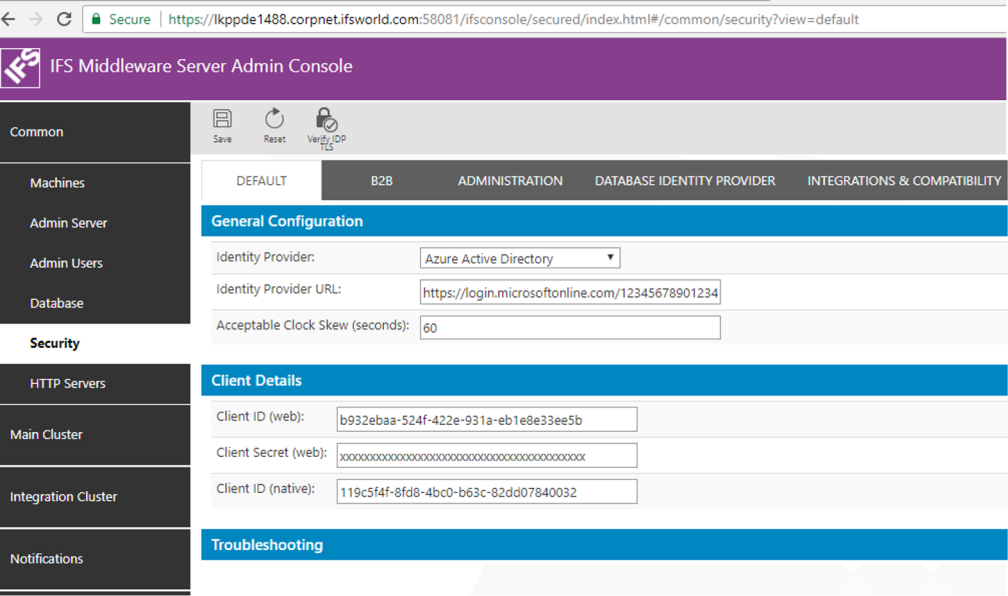
The DEFAULT tab holds the Open ID provider configuration details for Aurena client and the native applications. Select "Azure Active Directory" as the Identity Provider. Fill in the details as show below.
Parameter Value Identity Provider Azure Active Directory Identity Provider URL https://login.microsoftonline.com/<tenant_id>*
Note: tenant_id here is the Azure tenant id of your organization.
Alternative to the tenant_id you can use the name of the Azure Active Directory with the domain (e.g: https://login.microsoftonline.com/ifsdevsys.onmicrosoft.com)Acceptable Clock Skew (seconds) This will be the tolerated amount of clock skew when the validity of the token is calculated. E.g.: 60s Client ID (web) Application ID taken from the web app registration in Azure AD.
If you opted for the solution with one app registration here, you would use the same client ID for Client ID (web) and Client ID (native).Client Secret (web): Security Key generated when Aurena Web application was registered in Azure AD Client ID (native): Application ID taken from Azure AD app registration when IFS Enterprise Explorer and Touch apps were registered as a Native application.
If you opted for the solution with one app registration here, you would use the same client ID for Client ID (web) and Client ID (native).

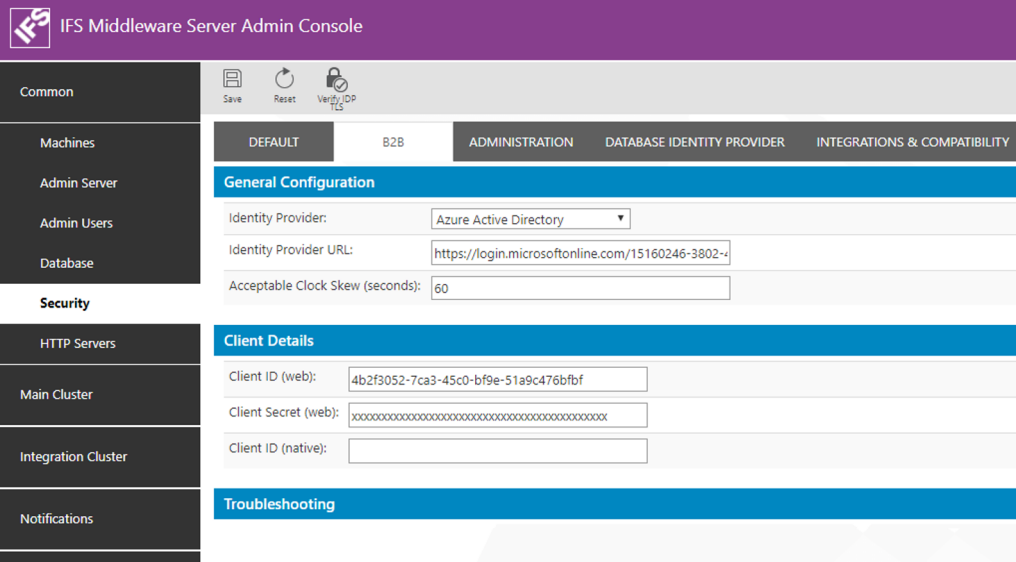
The B2B tab holds the Open ID provider configuration details for B2B client. Select "Azure Active Directory" as the Identity Provider. Fill in the details as show below.
Parameter Value Identity Provider Azure Active Directory Identity Provider URL https://login.microsoftonline.com/<tenant_id>*
Note: tenant_id here is the Azure tenant id of your organization.
Alternative to the tenant_id you can use the name of the Azure Active Directory with the domain (e.g: https://login.microsoftonline.com/ifsdevsys.onmicrosoft.com)Acceptable Clock Skew (seconds) This will be the tolerated amount of clock skew when the validity of the token is calculated. E.g.: 60s Client ID (web) Application ID taken from Azure AD app registration when B2B Web application was registered. Client Secret (web): Security Key generated when B2B Web application was registered in Azure AD Client ID (native): Leave this blank as there is no native application for B2B.

* How to find the <tenant_id> :
In Azure Portal click on the Azure Active
Directory. From the middle blade select "Properties". The properties of the
Azure Active Directory will open up in the right most blade. The field "Directory
ID" gives the Tenant Id of the the Azure Active Directory.
IFS Applications have a user registry of its own in the Oracle Database. These users are known as Foundation1 Users. A user authenticated from an External Identity Provider such as Azure AD needs to be mapped to a Foundation1 user for him to get access (authorization) to the application. This can be done through Solution Manager by changing the DIRECTORY_ID (also known as WEB_USER) value of your Foundation1 users.
The DIRECTORY_ID is used for the mapping between the external user identity in the Identity Provider and the Foundation1 user identity.
When Azure Active Directory is used as the user repository the email address of the user in the Azure AD (the login id used by the user to login to the Azure AD) must be the value that should be entered as the value for WEB_USER field. This should be entered in upper case.
If Azure Active Directory is enabled with Domain Services so that the AD is accessible using LDAPS protocol, the Active Directory Synchronization process can be used to synchronize users registered in the Azure AD to Foundation1 users.
NOTE: Solution Manager can be launched through the IFS Applications Admin Landing Page -> IFS Enterprise Explorer Admin. IFS Enterprise Explorer Admin uses DB Authentication always even when some other identity provider is configured for end user Authentication. Please refer Admin landing page for more information
To get functions such as Security Check Points to work in an environment where Azure AD is used as the Open Identity Provider it is required to enable Secure LDAP (LDAPS) in the Azure AD. In order to configure LDAPS the Azure AD has to be configured as a Azure AD Domain Service. You need a valid Azure Subscription to be able to do so. Following documentation provided by Microsoft Azure gives step by step instructions on how to do this: https://docs.microsoft.com/en-us/azure/active-directory-domain-services/active-directory-ds-admin-guide-configure-secure-ldap
Once you have successfully enabled Domain Services in Azure AD you will get a Secure LDAP External IP Address. You can communicate with the Azure Active Directory using the LDAPS protocol and perform functions such as user authentication using LDAPS. Now it is possible to configure the Compatibility AD authenticator to be the Azure AD.
In IFS Admin Console go to Common > Security and select the tab "Integrations and Compatibility". Fill in the details as given below for Active Directory Authenticator:
| Parameter | Value |
|---|---|
| Enabled | Tick to enable |
| Hostname | Input the Secure LDAP External IP Address obtained after enabling Domain Services in Azure AD. If domain name resolution is in place you should be able to use the Azure AD domain name here as well. |
| Use SSL | Tick to enable. |
| Port | 636 (Since LDAPs) |
| Username | When configuring the Domain Service an Admin user is added to the Admin Group AAD DC Administrator in Azure AD. Put that user name here. Use the format user@azureADdomain (e.g. adminuser@testdomain.onmicrosoft.com). |
| New Password | The user's password |
| User Base DN | This can remain blank |
| Group Base DN | This can remain blank |
More information on Compatibility Active Directory Authenticator can be found here >>.