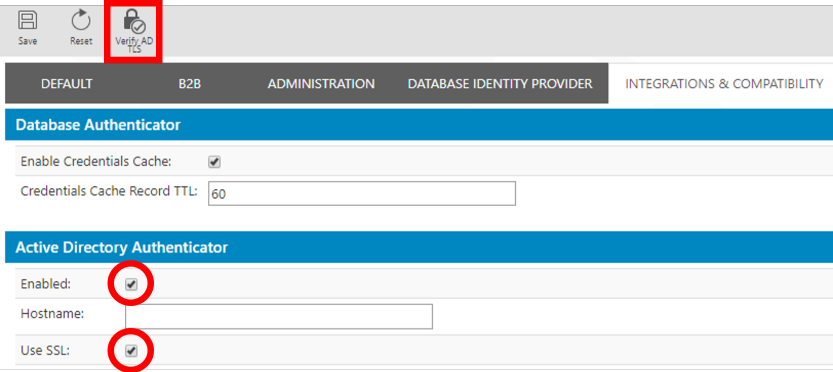
In IFS Admin console if you select Common > Security and the tab "Integrations & Compatibility" you can configure the authenticators required for the compatibility mode. This tab contains two different things. Configuration options for the cache of the compatibility database authenticator and configuration for the LDAP authentication provider used for compatibility mode authentication against Active Directory solutions.
Compatibility mode provides a way to authenticate users using Basic authentication in situations where it is not possible to use Open Identity Connect based logins. For each Open Identity Provider there is a matching authenticator available for compatibility mode login which you have to configure using the confguration tab that is discussed here. Given below is the mapping between the Open Identity Provider and the corresponding compatibility mode authenticator.
| Open Identity Provider | Compatibility mode authenticator |
|---|---|
| IFS Database Identity provider | Database authenticator |
| ADFS (Windows Server 2016) | Active Directory authenticator |
| Azure Active Directory | If Domain Services is enabled in Azure Active Directory making
it possible to connect to the Azure Active Directory using LDAPS
protocol then Active Directory authenticator should be configured as
the Compatibility mode authenticator. This is required also for correct
functionality of Security Checkpoints. More information can be found
here >>. Otherwise Database authentricator can be used as the Compatibility mode authenticator. In this case the users who will be used for Compatibility mode login has to be Database users. Users defined in Azure AD will not be able to login using Compatibility mode in this case. Also Security Checkpoints will not work when Compatibility mode is set to DB authentication. |
The compatibility database authenticator needs no special configuration to be done in order to work. Present here are some options for configuring the cache used by the database compatibility authenticator. When the cache is used, the compatibility database authenticator will keep a cache of usernames and password hashes that results in a successful authentication for a limited amount of time in order to avoid making database calls during that time. This has a substantial performance benefit for integrations that make a lot of calls to the backend.
There are two options available here.
The compatibility Active Directory authenticator uses LDAP to achieve HTTP Basic authentication using Active Directory and Azure AD. After a fresh installation, it is disabled. If HTTP Basic Authentication is to be possible with Active Directory or Azure AD, it must be configured. Aside from integrations and development tools, HTTP Basic authentication is also used by security checkpoints. If security checkpoints are needed in an environment using Azure AD or ADFS (backed by Active Directory) for OpenID Connect authentication the compatibility Active Directory authenticator must be properly configured.
NOTE: The compatibility Active Directory authenticator requires all servers to be restarted if any changes are to take effect.
There are several options available here.
Whenever some information is updated under Active Directory Authentication and the user tries to save the changes, validation of the provided information will be performed if the Enabled checkbox is checked. In this case, the validation consists of trying to connect to the host and port using the credentials informed, and then, if the connection succeeds, trying to look up the Group Base DN and User Base DN in the connected environment.
The provided information will be saved only if all the validation steps are performed without errors. In case something goes wrong, the user will receive an informative error message explaining the possible source of the error and the provided configuration will not be saved.
DN (Distinguished Names) is a sequence of relative distinguished names (RDN)
connected by commas.
The following is an example of a distinguished name:
CN=Erik Dahllöf,OU=Employees,OU=IFSUsers,DC=corpnet,DC=ifsworld,DC=com
The Base DN requested is the base for a recusrive search. I.e. from where to start the search for a particular user (or group). The closer towards the root a Base DN is set the more of the tree is scanned. This has a negative impact on performance but possibly more users (or groups) are included. It is recommended to narrow this down as much as possible. To include the above user, the Base DN would be:
OU=Employees,OU=IFSUsers,DC=corpnet,DC=ifsworld,DC=com
OU=IFSUsers,DC=corpnet,DC=ifsworld,DC=com and
DC=corpnet,DC=ifsworld,DC=com would yield the same result (but is less
optimized).
The larger the tree is the more important it is to limit the
search.
In the Hostname: Enter the fully qualified hostname of the Primary LDAP Server space (space character) fully qualified hostname of the failover LDAP Server, e.g.
lkpcndc1.corpnet.ifsworld.com lkpcndc2.corpnet.ifsworld.com
If SSL is enabled, the connection will be validated before any configuration is saved. If Enabled and Use SSL are checked, the validation is enabled. By pressing Verify AD TLS the process of validating connectivity can be started manually.

If TLS connectivity can be established and the LDAP server responds with a trusted certificate, no further action is needed when setting up LDAPS in comparison to LDAP. If the LDAP server responds with an untrusted certificate (which may be the case if the CA is an internal one or the certificate is self-signed), an option will be given to add the certificate to the IFS Middleware Server trust store. Note that for this change to take effect, all servers have to be restarted.
Review the details of the certificate to be added to the trust store. If they look fine, enter the key store password of the IFS Middleware Server. During installation of IFS Middleware Server this is set to the same password as the administrator password used when logging in to the IFS Middleware Server Admin Console. If the certificate was successfully added to the trust store, make sure to restart all servers for the changes to take effect.